How to create article outlines with AI based on Google’s Top 10
Use this guide and script to automate SEO content research to generate article outlines using AI, APIs and top-ranking page analysis.
The world of SEO has gotten increasingly nuanced. If you’re here, you know that merely writing an article and buying links to it hasn’t worked in a long while.
When I’m working on my own articles or with authors, I start with outlines.
After all, it’s easier to optimize pieces built to rank than to reverse engineer what you want later.
I’ve often focused a lot of my attention on understanding the content and structures of the top-ranking pages. Specifically, what questions they answered and what entities they contained.
I did a lot of this manually. And it took a lot of time.
Thankfully, with the rise of LLMs, a couple of APIs and a new scraper, we’re able to automate a lot of this. This can reduce the amount of time spent creating content structures that will rank. You can spend that saved time adding more of the insights that only you, as a human, can provide.
This article will walk you through a script to create article outlines based on:
- The keywords you’re targeting.
- The type of article you want to write.
- The top entities that appear on the top-ranking websites.
- The top questions answered by the top-ranking sites.
- Summaries of the top-ranking sites.
And if you’re not interested in coding yourself, I’ve even written a Google Colab you can use. You only need to sign up for the APIs (easy) and click some play buttons.
You’ll find the Colab here.
Before we dive into the code, here’s why I base my article outlines on these features.
Why use summaries, entities and top questions for article outlines?
We could use a number of features to inspire our outlines. I chose these three because they form the foundation of what should be included in content inspired by the top 10. Here’s why:
Summaries
Summaries help you distill what the top-ranking pages are doing well, including how they address search intent.
Keen eyes will notice that I’ve focused the summaries around the heading tags in the scripts. This ensures that when we teach the system to create an outline, it will look at the heading structures of the top-ranking sites.
We’ll be using a newer library called Firecrawl, which puts the content in a markdown format. This allows us to base our understanding of the content on more advanced structural elements, including headings. This is a big leap forward.
Entities
Entities are specific, well-defined concepts, such as “artificial intelligence,” “New York City” or even an idea like “trust.” Google recognizes entities to better understand content at a deeper level, beyond just keywords.
For SEO, this means Google connects entities within your content to related ideas, creating a web of associations. Including the top entities relevant to your topic helps you align your article with what Google sees as contextually important and related.
I rank the entities by their salience scores, which indicate how important they are to the page’s content.
Top questions
Top questions are another key piece because they represent what real users want to know.
My thought is that, by extension, questions Google wants answered. By answering these questions within the article, you will likely satisfy search intent more fully.
Getting started
You can run this script locally on your machine using an IDE (Integrated Development Environment).
The remainder of this article is written for that environment.
The great news? You can have this all set up and running on your machine in just a few minutes.
If you’ve never used an IDE before, you can start by installing Anaconda. It does many things, but we only want to use Jupyter Notebook for now.
Download and install Anaconda here, after which you can simply launch “jupyter” to get going.
Once you’ve done that, you can jump into the tutorial.
This route will give you an easier overall experience. You can save your API keys locally and not have to enter them each time. Plus, you can edit the prompts and other variables more easily.
Alternatively, you can simply run the Colab. This is also an easy way to test whether it’s worth setting up locally.
Step 1: Getting your API keys
First, you’ll need to sign up for the API keys you’ll need.
What is an API?
APIs (application programming interfaces) are essentially pipelines that let different software systems communicate and share data.
Think of them as a structured way to request specific data or functions from a service (like Google or OpenAI) and get back exactly what you need, whether that’s analyzing entities on a page, generating text or scraping content.
The APIs we will need are:
- Custom search and Cloud Natural Language APIs (see below): This is to manage your custom search engine and extract entities from pages. It is paid, but my bill using it a lot is just a couple dollars per month.
- OpenAI: This is for content analysis and creation via GPT-4o. The API is low-cost (a dollar or two per month under regular use) and has a free trial.
- Firecrawl: This is for scraping webpages. As this level, the free option should work just fine, but if you start using it a ton they do have inexpensive options available.
- Weights & Biases (disclosure: I’m the head of SEO at Weights & Biases): Sign up and obtain your API key. The free option will do everything we need.
Custom search and Google Cloud Natural Language APIs
I found getting these APIs set up a bit non-intuitive, so I wanted to save you the 10 minutes of figuring it out. Here’s a step-by-step guide to getting yourself setup with the Google APIs:
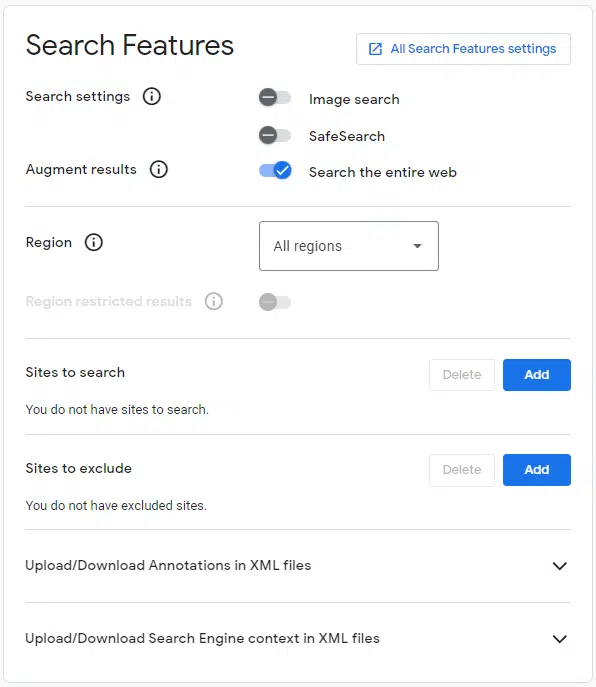
To set up your search engine, just follow the quick instructions at https://developers.google.com/custom-search/docs/tutorial/creatingcse.
The settings I use are:
Google API key
The API key gives you access to the search engine. Again, it’s easy to set up, and you can do so at https://support.google.com/googleapi/answer/6158862?hl=en.
When you’re in the console, you’ll simply click to Enable APIs and services:
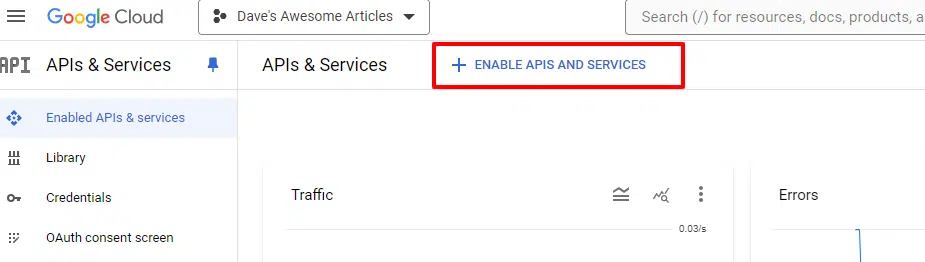
And you’ll want to enable the Custom Search API and Cloud Natural Language API.
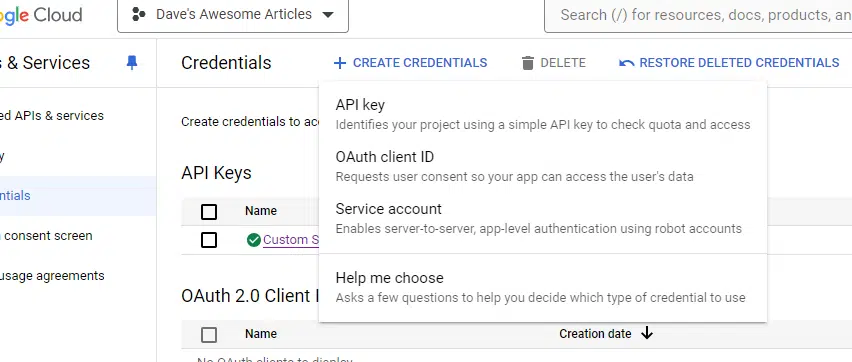
You’ll also need to set up your credentials:
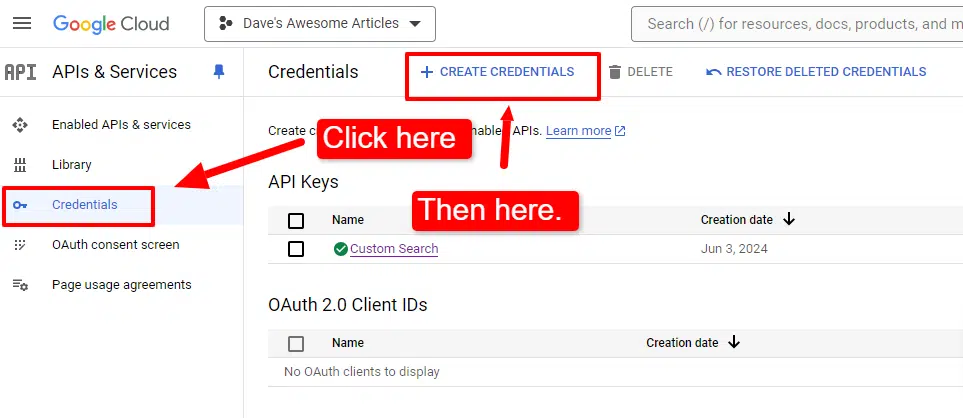
Then, select API key from the drop-down:
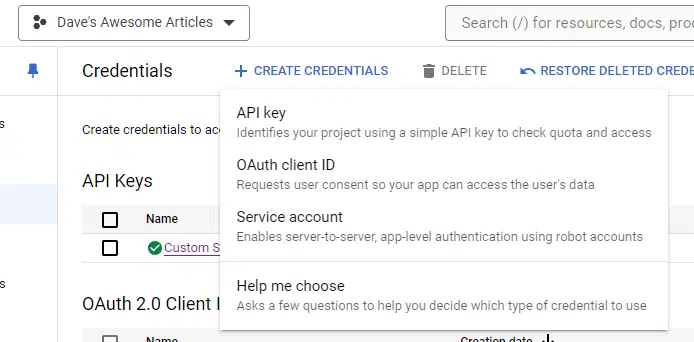
Copy the key to a Notepad file. You can save it there, but we’ll need it in a moment, so I generally paste mine in an unsaved doc.
For good measure, I recommend clicking on the API Key you just created. It will have an orange triangle beside it, noting that it’s unrestricted.
You can click it, set the API to restricted and give it access to just the Custom Search API to help safeguard against misuse.
Google service account
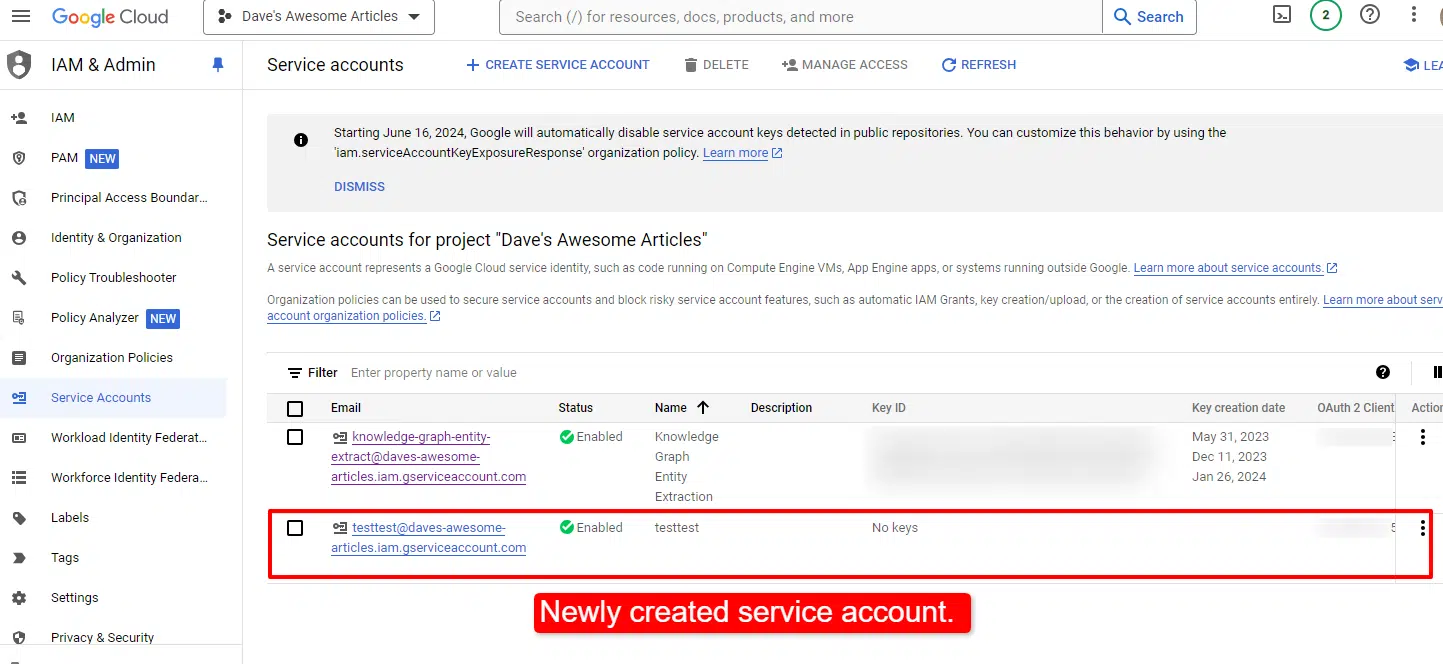
While you’re on this screen, you can set up the service account.
Again, you’ll click on Create credentials, but instead of API key, you’ll click Service account.
You’ll just need to name your project and select the role.
As I’m the only one with access to my projects and machine, I just set it as owner. You may want to choose otherwise. You can find out more about the roles here.
Once you’ve created the service account, you need to create a key for it. If you’re not automatically taken to do so, simply click on the service account you just created:
Click Keys in the top tabs and then Create new key.
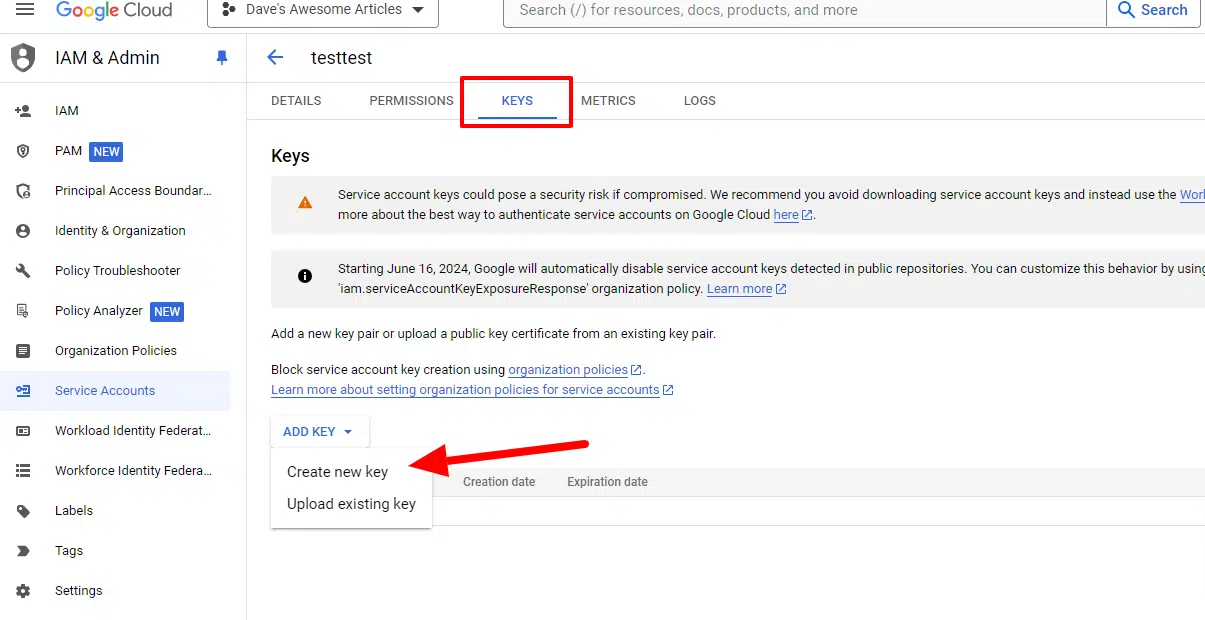
Choose JSON.
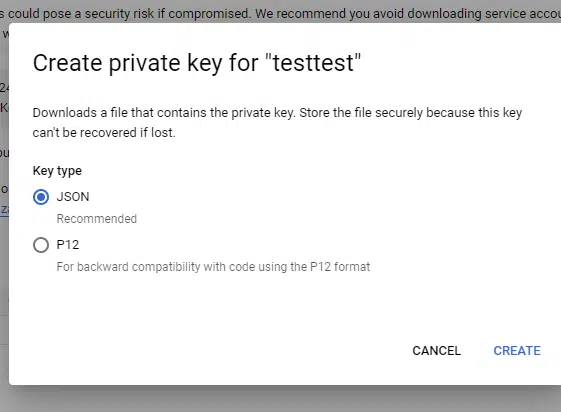
The key will automatically download to your machine. Save it to a location where it can stay and copy the path to it. You’ll need that path and the filename shortly.
We’re ready to get going! Open Jupyter Notebook and add the code blocks. I like to add short descriptions of what the blocks do for my future reference, but that’s up to you.
Step 2: Defining the article you want an outline for
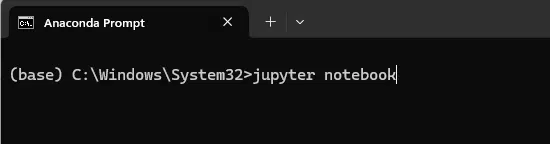
After you have launched your Jupyter Notebook (or preferred IDE) by opening the Anaconda prompt:
And entering “jupyter notebook”:
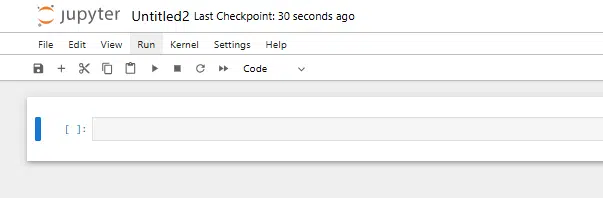
You’ll create a new Python 3 notebook: File > New > Notebook
And start copying and pasting the code below into the cells:
In the first cell, we’ll enter:
# Step 1: Define your target keywords and article type

# Define the primary term that you're trying to rank for.
query = input("What do you want to rank for: ")

# Define any secondary terms you're trying to rank for.
query_secondary = input("Are there other terms you're trying to rank for (comma separated): ")

# Define the type of article outline you want to create.
article_type = input("What type of article is it (e.g., deep dive, quickstart, tutorial, etc.): ")
When you click this cell, it will ask you the three questions above, which will be used further below.

Step 3: Installing the libraries you’ll need
The next step is to install all the libraries we’ll need. They are:
- google.cloud.language_v1: This is part of the Google Cloud NLP library, used for analyzing entities.
- googleapiclient.discovery.build: We’re using this one for our custom search engine.
- openai: Not surprisingly, we’re using this one to work with the OpenAI API and use GPT-4o.
- firecrawl: We’re using this one to scrape the top webpages.
- wandb and weave: We’re using these two libraries to log our prompts and other inputs for evaluation.
- Some supporting libraries, like os, time and getpass, that simply facilitate functionality.
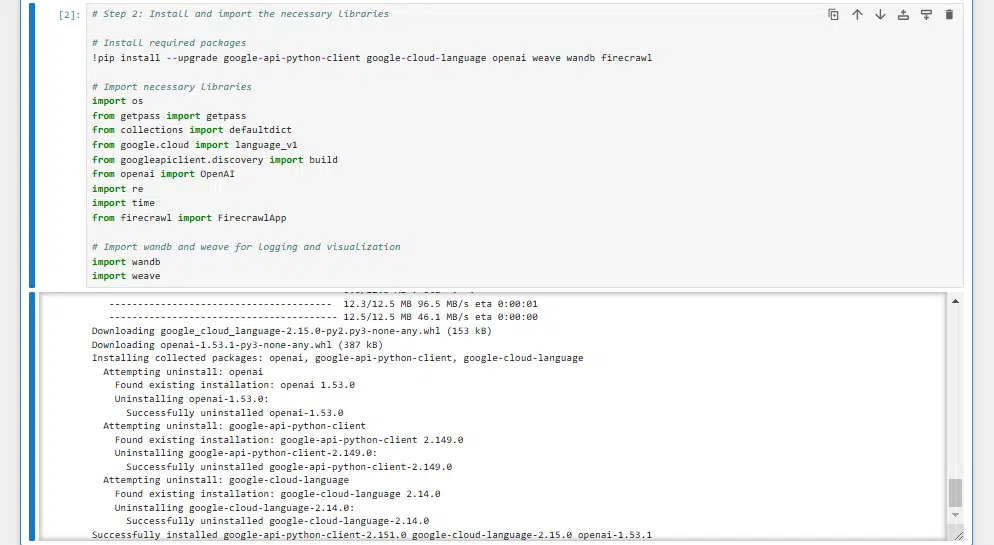
You’ll install these with the following code:
# Step 2: Install and import the necessary libraries

# Install required packages
!pip install --upgrade google-api-python-client google-cloud-language openai weave wandb firecrawl

# Import necessary libraries
import os
from getpass import getpass
from collections import defaultdict
from google.cloud import language_v1
from googleapiclient.discovery import build
from openai import OpenAI
import re
import time
from firecrawl import FirecrawlApp

# Import wandb and weave for logging and visualization
import wandb
import weave
This might take a minute or two to run and will look like:
Step 4: Adding our APIs
This section differs from the Colab, where you enter your API keys one by one to avoid leaving them in a public location.
If you are working on your own secure machine, you may want to add your API keys directly into the script.
Alternatively, you can use the code from the Colab for this block and have the script ask you for your API keys each time.
The code for this step is:
# Google API Key
google_api = 'YOUR_GOOGLE_API_KEY'

# Google Application Credentials (JSON file path)
os.environ['GOOGLE_APPLICATION_CREDENTIALS'] = 'C:/Users/PATH_TO_YOUR_APPLICATION_CREDENTIALS/FILE.JSON'

# Google Custom Search Engine ID
google_search_id = 'SEARCH_ENGINE_ID'


# Firecrawl API Key
firecrawl_api_key = 'FIRECRAWL_API_KEY'
app = FirecrawlApp(api_key=firecrawl_api_key)


# Initialize Weights & Biases
wandb_api_key = 'WEIGHTS_AND_BIASES_API_KEY'
wandb.login(key=wandb_api_key)

# OpenAI API Key
openai_api_key = 'OPENAI_API_KEY'
os.environ["OPENAI_API_KEY"] = openai_api_key
Remember above where I noted you’d need to copy the path to the application file and also the filename itself. That’s what you put in the block:
C:/Users/PATH_TO_YOUR_APPLICATION_CREDENTIALS/FILE.JSONFor example, that line in my script looks like:

We’ve now set the stage. Let’s get into the meat of the script.
Step 5: Defining the functions
The next step is to define the functions we’ll need to make this all work.
The functions we’re defining are:
google_search: This function uses Google’s Custom Search API to pull the top 10 results for the primary term we provided in step one.fetch_content_with_firecrawl: This one’s our scraper, fetching content from the top 10 using Firecrawl. If a page blocks access, it’ll let you know and move on.extract_headings_from_markdown: Parses markdown content and extracts the headings from the scraped content.generate_summary: This function leverages GPT-4o to create a concise summary of each of the top pages based in part on the headings.extract_questions: This one pulls out essential questions from the top-ranking pages using GPT-4o.top_questions: This function sorts through all the extracted questions to find the most relevant and useful ones across all the top-ranking pages.analyze_entities: This one uses Google Cloud NLP to analyze and extract entities (the “who,” “what,” and “where” of the content). This helps us understand what concepts are central to the text, so we can make sure these core elements are woven into the article outline.
The code for this is:
# Step 4: Define functions

# Setup Google Search API
def google_search(search_term, api_key, cse_id, **kwargs):
    service = build("customsearch", "v1", developerKey=api_key)
    res = service.cse().list(q=search_term, cx=cse_id, **kwargs).execute()
    return res['items']

# Function to extract content from a webpage using Firecrawl
def fetch_content_with_firecrawl(url):
    try:
        scrape_result = app.scrape_url(url, params={'formats': ['markdown']})
        if '403 Forbidden' in scrape_result.get('status', ''):
            print(f"Access to {url} was denied with a 403 Forbidden error.")
            return None
        page_text = scrape_result.get('markdown', '')
        if not page_text:
            print(f"No content available for {url}")
            return None
        return page_text
    except Exception as e:
        print(f"Error fetching content from {url}: {str(e)}")
        return None

# Function to extract headings from markdown text
def extract_headings_from_markdown(markdown_text):
    """Extract headings from markdown text based on markdown syntax."""
    headings = []
    for line in markdown_text.split('\n'):
        line = line.strip()
        if line.startswith('#'):
            # Remove leading '#' characters and any extra whitespace
            heading = line.lstrip('#').strip()
            if heading:
                headings.append(heading)
    return headings

# Function to generate a summary of the text using OpenAI GPT-4o
def generate_summary(text, headings):
    """Generate a GPT-4o summary of the text using the headings."""
    # Prepare the prompt
    headings_text = '\n'.join(f"- {heading}" for heading in headings)
    prompt = (f"Summarize the following article, focusing on these headings:\n{headings_text}\n\n"
              f"The summary should be concise (max 500 tokens) and capture the key points.")
    try:
        response = client.chat.completions.create(
            messages=[
                {"role": "system", "content": "You are an expert summarizer."},
                {"role": "user", "content": prompt + "\n\n" + text}
            ],
            model="gpt-4o",
            max_tokens=500,
            temperature=0.2,
            n=1
        )
        summary = response.choices[0].message.content.strip()
        return summary
    except Exception as e:
        print(f"Error generating summary: {e}")
        return "Summary not available."

# Function to extract questions from the text using OpenAI GPT-4o
def extract_questions(text):
    """Extract questions from the text using GPT-4o."""
    prompt = (f"Extract the top 5 most important questions from the following text related to the query '{query}'. "
              f"List them as bullet points.\n\n{text}")
    try:
        response = client.chat.completions.create(
            messages=[
                {"role": "system", "content": "You are a helpful assistant who extracts key questions from texts."},
                {"role": "user", "content": prompt}
            ],
            model="gpt-4o",
            max_tokens=1000,
            temperature=0.1,
            n=1
        )
        questions_text = response.choices[0].message.content.strip()
        # Split the response into individual questions based on bullet points
        questions = re.findall(r"-\s*(.*)", questions_text)
        if not questions:
            questions = [questions_text]
        return questions
    except Exception as e:
        print(f"Error extracting questions: {e}")
        return []

# Function to select the top questions
def top_questions(all_questions):
    """Generate the top questions from the list of all questions."""
    try:
        questions_text = '\n'.join(f"- {question}" for question in all_questions)
        prompt = (f"From the following list of questions extracted from top articles about '{query}', "
                  f"select the 5 most important questions that would be most useful to the user. "
                  f"List them as bullet points.\n\n{questions_text}")
        response = client.chat.completions.create(
            messages=[
                {"role": "system", "content": "You are an expert at identifying key questions on a topic."},
                {"role": "user", "content": prompt}
            ],
            model="gpt-4o",
            max_tokens=500,
            temperature=0.1,
            n=1
        )
        top_questions_text = response.choices[0].message.content.strip()
        # Split the response into individual questions based on bullet points
        top_questions_list = re.findall(r"-\s*(.*)", top_questions_text)
        if not top_questions_list:
            top_questions_list = [top_questions_text]
        return top_questions_list
    except Exception as e:
        print(f"Error generating top questions: {e}")
        return []

# Function to analyze entities using Google Cloud NLP
def analyze_entities(text_content):
    """Analyze entities in the text using Google Cloud NLP."""
    try:
        document = language_v1.Document(content=text_content, type_=language_v1.Document.Type.PLAIN_TEXT)
        response = nlp_client.analyze_entities(document=document, encoding_type=language_v1.EncodingType.UTF8)
        return response.entities
    except Exception as e:
        print(f"Error analyzing entities: {e}")
        return []
Step 6: Scraping the top 10 and collecting the information
We’re almost there. In this step, we use the functions above and send our crawler across the top 10 ranking pages (you can change this number).
We’re also going to write some of the core information to Weights & Biases so we can review the various inputs we’ve collected.
When I refer to inputs, I mean the entities, questions and summaries we’ll use to augment our article outline generation prompt in step seven, our final step.
The code for this step is:
# Step 5: Scrape and analyze the top ranking pages
client = OpenAI()
# Initialize Weights & Biases
wandb.init(project="wandb-article-outlines")
weave.init('wandb-article-outlines')
# Create W&B Tables to store scraped data
firecrawl_table = wandb.Table(columns=[
"url",
"markdown_summary",
"artifact_link",
"title",
"description",
"language",
"status_code"
])
top_questions_table = wandb.Table(columns=[
"question"
])
entities_table = wandb.Table(columns=[
"entity",
"aggregated_score",
"page_count"
])
# Initialize a list to collect all questions, entities and summaries
all_questions = []
entity_data = {}
markdown_summaries = []
# Initialize Google Cloud NLP client
nlp_client = language_v1.LanguageServiceClient()
# Search and scrape top 10 pages
search_results = google_search(query, google_api, google_search_id, num=10)
for result in search_results:
url = result['link']
print(f"Processing URL: {url}")
# Fetch content using Firecrawl
page_text = fetch_content_with_firecrawl(url)
if page_text is None:
print(f"Failed to fetch content from {url}")
continue # Skip if no content
# Save the full content as a file
safe_title = ''.join(c if c.isalnum() else '_' for c in result.get('title', 'page_text'))
artifact_filename = f"{safe_title}.txt"
with open(artifact_filename, 'w', encoding='utf-8') as f:
f.write(page_text)
# Create and log the artifact
artifact = wandb.Artifact(name=f"page_text_{safe_title}", type='page_text')
artifact.add_file(artifact_filename)
artifact = wandb.run.log_artifact(artifact) # Capture the logged artifact
artifact.wait()
artifact_link = artifact.get_entry(artifact_filename).ref_url
# Extract metadata
title = result.get('title', 'Unknown Title')
description = result.get('snippet', 'No description available')
language = 'en'
status_code = 200
# Extract headings from the markdown text
headings = extract_headings_from_markdown(page_text)
# Generate a summary using GPT-4
markdown_summary = generate_summary(page_text, headings)
if markdown_summary:
markdown_summaries.append(markdown_summary)
else:
print(f"No summary generated for {url}")
# Extract questions from the page and add them to the list
questions = extract_questions(page_text)
all_questions.extend(questions)
# Analyze entities in the page text
entities = analyze_entities(page_text)
page_entities = set() # To track unique entities in this page
for entity in entities:
entity_name = entity.name
salience = entity.salience
# Update entity data
if entity_name in entity_data:
entity_info = entity_data[entity_name]
entity_info['total_salience'] += salience
if url not in entity_info['pages']:
entity_info['page_count'] += 1
entity_info['pages'].add(url)
else:
entity_data[entity_name] = {
'total_salience': salience,
'page_count': 1,
'pages': {url}
}
# Add data to the table, including the markdown summary and artifact link
firecrawl_table.add_data(
url,
markdown_summary,
artifact_link,
title,
description,
language,
status_code
)
# Clean up the temporary file
os.remove(artifact_filename)
# After processing all pages, generate the top questions
top_questions_list = top_questions(all_questions)
# Add the top questions to the table
for question in top_questions_list:
top_questions_table.add_data(question)
# Determine the top entities
# Calculate a combined score: total_salience * page_count
for entity_name, data in entity_data.items():
aggregated_score = data['total_salience'] * data['page_count']
data['aggregated_score'] = aggregated_score
# Sort entities by the aggregated score
top_entities = sorted(entity_data.items(), key=lambda item: item[1]['aggregated_score'], reverse=True)
# Get the top N entities (e.g., top 10)
top_n = 10
top_entities = top_entities[:top_n]
# Add top entities to the entities table
for entity_name, data in top_entities:
entities_table.add_data(
entity_name,
data['aggregated_score'],
data['page_count']
)
# Log the tables to W&B
wandb.log({
"scraped_data": firecrawl_table,
"top_questions_table": top_questions_table,
"entities_table": entities_table,
"markdown_summaries": markdown_summaries,
})
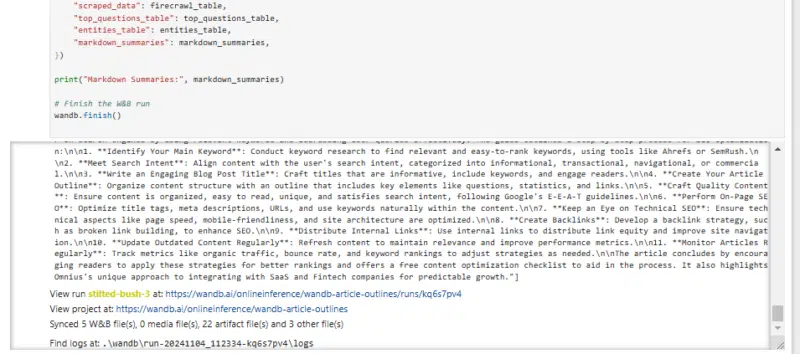
print("Markdown Summaries:", markdown_summaries)
# Finish the W&B run
wandb.finish()The cell will take a few minutes to finish running, and when it does, you’ll see something like:
The system displays entities, questions, and summaries directly on the screen after a run.
However, I prefer a simpler approach: clicking the Last run link to view the results instead.
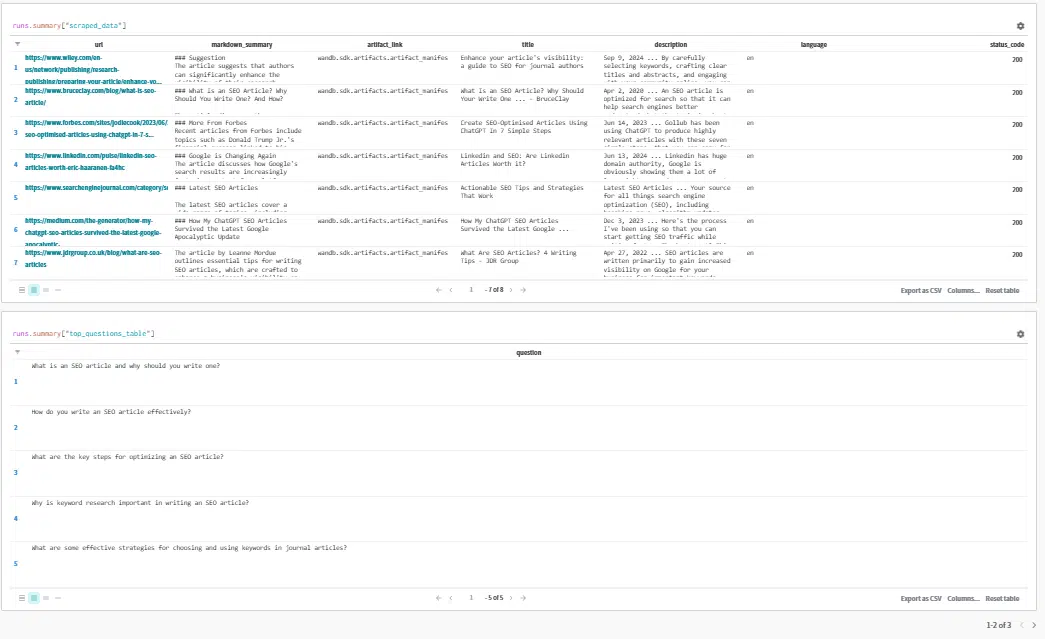
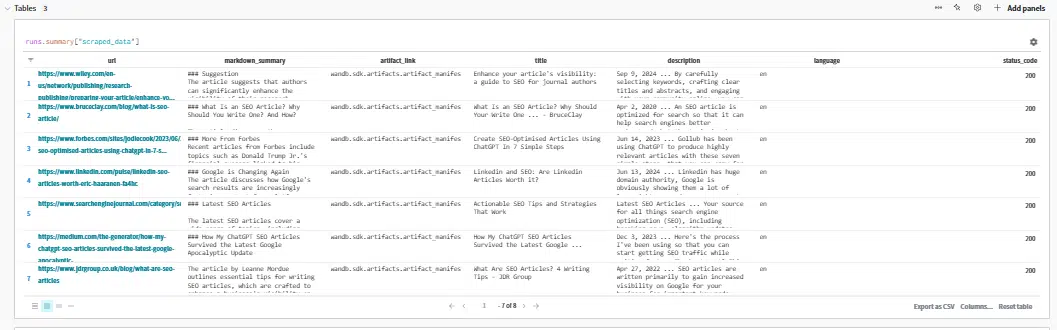
Here, we can review the output being passed to the prompt. This can help identify where things may go awry if you’re finding your outlines aren’t quite right.
Step 7: Generating our article outline
Now we can generate the article outline.
I invite you to review and edit the prompt to suit the formats you’ve found helpful.
The one here is fairly generic. It is based on formats and rules I’ve found successful, but with some specifics to individual use cases removed.
The code to create the outline is:
# Generate the article outline using the collected data
@weave.op()
def generate_outline(top_entities, top_questions, query, query_secondary, article_type, markdown_summaries):
entities_str = ', '.join([entity_name for entity_name, _ in top_entities])
questions_str = ', '.join(top_questions)
summaries_str = '\n\n'.join(markdown_summaries)
try:
response = client.chat.completions.create(
model="gpt-4o",
messages=[
{"role": "system",
"content": "You create succinct and clear article outlines. You can include your understanding "
"of a topic to enhance an outline, but the focus should be on the inclusion of the entities, questions and top ranking content you are provided with."},
{"role": "assistant", "content": "You are a highly skilled writer and you want to produce a " + article_type +
" article outline that will appeal to users and rank well for queries given by the user. "
"The outline will contain headings and sub-headings, with clear and concise descriptions of the content "
"that is recommended for that section and why. \n When you are recommending to create an introductory paragraph to a section, to capture a featured snippet, "
"note that it should be between 260 and 320 characters and then provide a clearly noted example of what one might be. "
"\n After you have provided the outline, explain clearly how this article outline "
"could be used to create an article that will rank well using best-practice SEO strategies as well as be helpful "
"to users. You will be judged based on how well the article ranks, as well as how engaging the article is to readers, "
"and provide the metrics you would suggest be used to judge whether you are successful. \n An example of an article "
"structure that works well is: \n\n"
"Title: Top-Level Content (e.g., An Introduction to [Main Topic])\n\n"
"The description: Visible on the page as well as used as the description to Google. Should be 130 <= character_count "
"<= 160 and include the main keywords whenever possible.\n\n"
"**Introduction**\n\n"
"We don't need a heading tag here. Simply dive in with a brief description of what you'll be covering. One or two short "
"paragraphs is great, but longer is fine.\n\n"
"**H2 - Table Of Contents**\n"
"Ideally this section is done manually, but in a pinch, you can use the / Table Of Contents feature. You can add a bit of "
"additional content below the table of contents if you like.\n\n"
"**H2 - What Is [Main Topic]?**\n"
"Ideally here we have a section on the main topic. It will start with a paragraph that runs between 230 and 260 characters. "
"This first paragraph should be the short answer to the question and it will hopefully get picked up as a featured snippet "
"and be used for voice search. It can and should be extended from there to provide additional information and context.\n\n"
"**H2 - Optional - Subset Such As 'Types Of [Main Topic]'**\n"
"Brief description here--ideally 230 to 260 characters.\n\n"
"**H3 - [Subset Type One] (e.g., First Subtype of [Main Topic])**\n"
"Description of [Subset Type One]. Ideally starting with 260 to 320 characters, but not mandatory and expanding from there.\n\n"
"**H3 - [Subset Type Two] (e.g., Second Subtype of [Main Topic])**\n"
"Description of [Subset Type Two]. Ideally starting with 260 to 320 characters, but not mandatory and expanding from there.\n\n"
"**H2 - A tutorial for [Main Topic]**\n"
"Generate a tutorial based on common macnmachine learning tasks, which are likely found in the summaries provided by the user. You should use W&B Weave whenever possible.\n\n"
"**H2 - What Is [Main Topic] Used For?**\n"
"Again, ideally this starts with a 230 to 260 character short answer and is expanded upon.\n\n"
"**H2 - Examples Of [Main Topic]** \n"
"Optionally, we can place a brief description of the types of examples. It should be done in H3 tags (assuming it's a simple one). "
"A robust example requiring multiple stages (e.g., setup, running, visualizing) may require multiple H2 tags with H3s nested beneath.\n"
"**H2 - Recommended Reading On [Main Topic]** \n"
"Here we simply add a list with 2 or 4 articles you feel are related and would be of interest to the reader."},
{"role": "user",
"content": "Create an article outline that will rank well for " + query + " as the primary term and " + query_secondary +
" secondary keywords, which are less important but should still be considered. The following entities appear to be "
"relevant to ranking in the top 10 and should be worked into the page:\n" + entities_str + "\n Try to ensure the outline "
"will make it easy to work these into the article prominently and explain how this might be done in comments. Additionally, "
"the following questions appear to be important to answer in the article:\n" + questions_str +
"\n The following are summaries of the content and format that can be found on the top-ranking pages. This should heavily influence "
"the outlines you produce, as this content ranks well: \n" + summaries_str + "\n"
"Try to ensure that it will be easy to answer these questions in the article and again, explain how you would recommend "
"doing this in a way that will seem useful to the user. The article outline should begin by explaining \n- all of the core "
"concepts required to understand the topic"
}],
max_tokens=2000,
temperature=0.2,
n=1
)
return response.choices[0].message.content.strip()
except Exception as e:
print(f"Error generating outline: {e}")
return "Outline not available."
# Generate the article outline
article_outline = generate_outline(
top_entities,
top_questions_list,
query,
query_secondary,
article_type,
markdown_summaries
)
# Optionally, you can print or save the article outline
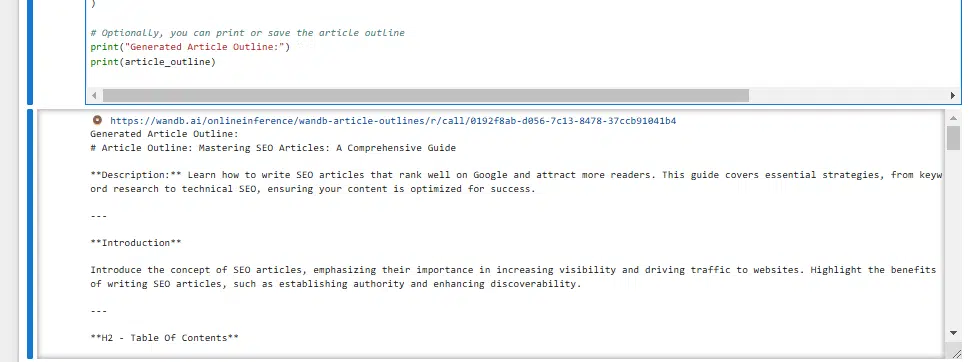
print("Generated Article Outline:")
print(article_outline)You’ll get your outline once you’ve run this (about a minute or so).
If you look at the prompts, you’ll see that I’ve told it to develop the article outline using the article type we defined in Step 1, as well as the targeted queries, top question, entities and summaries.
As noted above, this allows us to generate articles inspired by what’s working on the best-performing sites.
The default output looks like this:
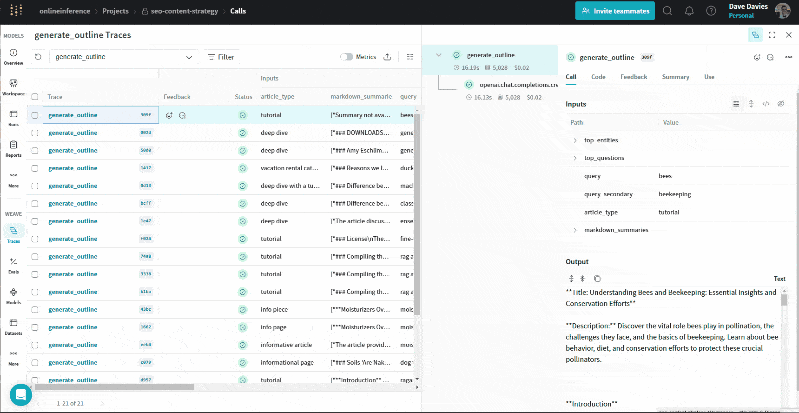
But if we click the link at the top, we are moved into W&B Weave, where we can contextualize that outline.
The GIF below illustrates how we can review the entities and their salience scores, top questions, URL summaries, queries and article types alongside the output (the outline) for troubleshooting and to understand the information used to generate the outline.
Just the beginning
Hopefully you find this script and its features as useful as I do. I also hope you don’t just use the script without making any changes.
Explore how to adjust the prompts, add to them and maybe even think about different APIs you could supplement the data with.
I’m already working on some new enhancements. I’d love to hear your ideas.
Contributing authors are invited to create content for Search Engine Land and are chosen for their expertise and contribution to the search community. Our contributors work under the oversight of the editorial staff and contributions are checked for quality and relevance to our readers. The opinions they express are their own.
Related stories
New on Search Engine Land
About the author