How to get started in Google Analytics 4
Transitioning from Universal Google Analytics to Google Analytics 4 can seem daunting, but if you start to organize your data strategy now, the transition can be seamless and easy.
The one constant in website data is it’s always changing, and Google Analytics is no different. In October, Google announced the release of Google Analytics 4 (previously called App + Web), billing it as an analytics tool that provides smarter insights to improve ROI as digital marketing moves to a cookie-less world.
After an announcement like this, the first question every digital marketer asks is, “How does this directly impact my job?” The move to Google Analytics 4 is going to change how every person uses Google Analytics. The good thing is that we have time to prepare for it: Google hasn’t started talking about when it will sunset Universal Google Analytics, so there is no need to panic. Taking time now to understand how your data works in GA4 will save you time and headaches later.
Setting up your first data stream
The first step with Google Analytics 4 is setting up your data stream. In the admin section for Universal Google Analytics is the ability to upgrade a property. If you choose to upgrade your property now, you will have to be using the gtag install for GA. The upgrade will create a new property for tracking that starts with G-.
In order to keep the universal property firing while you learn the new interface, you will have to have both tags firing on your site. This is key to keep using the universal reporting we are all familiar with while you learn GA4.
After you create the property, you will have to connect a data stream to it. If you are tracking both website and app traffic, you can add both data streams to one report. If you only use Google Analytics on a website, you’ll only have to set up a website stream.
By default, GA4 will measure page views, scrolls, outbound clicks, site search, video engagement and file download. Once you create a stream, Google will give you the full G property and code to install it on your site. Remember, you still want to have your Universal Google Analytics code firing on the site, or through Google Tag Manager, for data to flow to both versions of GA.

Realtime refresh in GA 4
Once your new code is installed on the site, navigate to the Realtime report to confirm the data is flowing in. GA4 has combined all the individual reports from Realtime into one mega report. The user map now will update in real-time, plus show you data from the last 30 minutes.
The two other big changes are with the events and conversions: Google Analytics 4 is making the pivot to focus on engagement, so all user activity, including page views, are being tracked as events. The second change is the conversions menu. Those “important actions” that we use to track as goals are now all called conversions. Google has also upgraded the number of conversions you can track to 30.
Even with an increase in trackable conversions, you will still need to be smart about which events you are tracking. Google also thought about it and added one of the coolest features to GA 4: now, you can customize and edit events right in the Analytics interface. Being able to customize and create events right in GA means less reliance on coding event tracking in Google Tag Manager.
Editing your events in GA4
When you first navigate to the events menu, it will show the standard events that come with Google Analytics 4. You’ll also have the buttons at the top of that screen that allow you to modify an existing event, or create a new event. The menu also has easy sliders that turn any event into a tracked conversion.
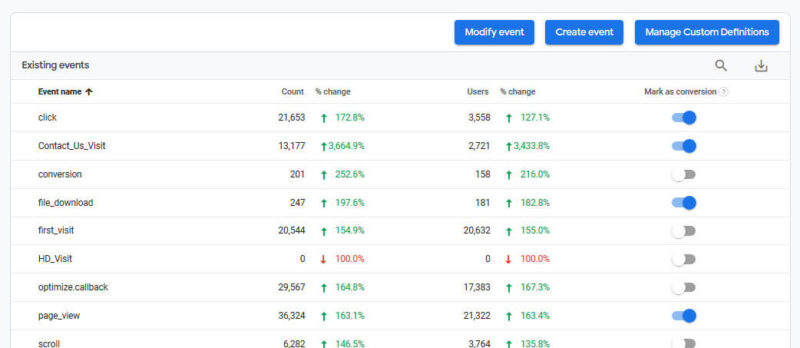
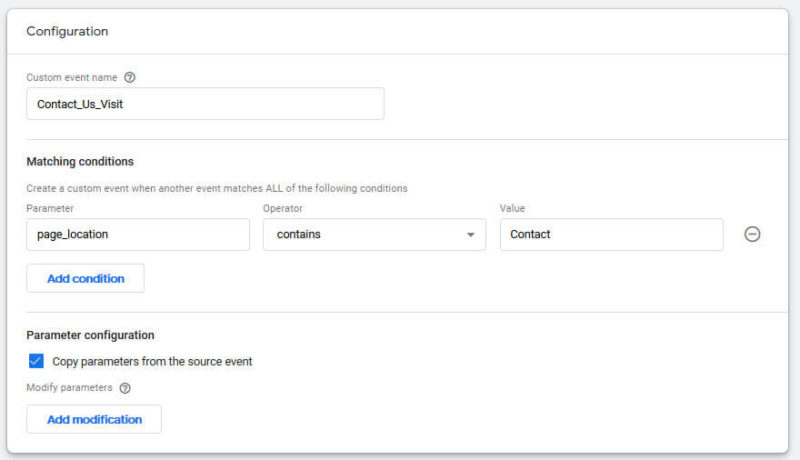
While every user click on your website is important, only some clicks should be counted as conversions. That’s where modifying events becomes key. You can set up new events that only count certain clicks. To do that, first, click on the “create an event” button. You’ll then give the event a new name and the conditions for that event. Since all page views in GA4 are considered events, you can create an event for “page location” and then put in the page name you want to track.
In the example below, we’ve created a new event for visits to the “Contact Us” page on a website. Once you create your first event it will take about 24 hours for it to show up in the conversions and events screen. To verify your new events right away, click back into the Realtime menu and you’ll be able to see the new custom event.
Change doesn’t have to be scary
At first look, Google Analytics 4 seems drastically different and that change can scare people off. The good news is, as digital marketers, we’re all in the same boat of learning a whole new system. We also have time to learn this new tool.
As you build a learning plan, make a list of the reports in Universal Google Analytics that you visit the most. Once you have that list together, start to work at finding that same data in GA4. Tackle this change one report at a time and you’ll be prepared to make the full migration to Google Analytics 4.
Contributing authors are invited to create content for Search Engine Land and are chosen for their expertise and contribution to the search community. Our contributors work under the oversight of the editorial staff and contributions are checked for quality and relevance to our readers. The opinions they express are their own.
Related stories
New on Search Engine Land
About the author