Images: Your easiest page speed win
Page speed is important for both rankings and user experience, yet columnist Kristine Schachinger notes that many companies are missing an easy opportunity to improve in this area: image optimization.

Over the past few years, page speed has become very important in terms of your site’s traffic and rankings. People want fast sites — and because users want fast sites, Google does, too. Sites that are fast do better than slow sites in Google’s search engine rankings, all else being equal.
Now, there are areas related to page speed where you need technical developers who can change how the stack loads and optimize your server performance. However, not all issues of page load are complicated or require much technical knowledge. In this case, the issue we are talking about is image weight. Images are often a major issue for sites with slow page load.
Luckily, optimizing images is a really easy win.
Images and page load
Whenever we audit sites for slow page load, images are almost always a significant part of the issue. Those who create websites seem to have forgotten that we need to resize and compress images before uploading and not just leave it to the site CMS or server compression software.
Today, we often see pages with megabytes of images on the page. That is megabytes. A page should never be larger than 1 megabyte, let alone several megabytes, yet this is a frequent finding. In fact, many sites even come in at more than 10 MB per page. No web page should ever be that large — and when it is, there is almost always an image optimization issue.
Simply knowing how to properly size/compress/save an image and implementing a process to make sure this happens can fix a large percentage of page weight issues.
So when did we go awry?
When I started in web development almost 20 years ago, sites could not have a heavy load and still expect to garner any traffic. Pages were fully loaded in under 100–250 KB — html, images, scripting and all. They had to be. Browsers and connections were slow.
This had nothing to do with search engines. Sites just could not load in properly at large weights. A 1-MB-per-page site I knew of back then took over 15 minutes to load. Yes, 15 minutes.
Now that we are in the era of fast connections, sites have become very lax in monitoring page weight, resulting in sites that can be as large as 25 MB per page (true story). The issue is, in some ways, these slow page loads matter even more now than they did back then. Today, we not only have restrictive parameters like mobile, but also, your rankings in Google are affected by slow page load.
Because page load was so important in the early days of the internet, companies used to have graphics people dedicated to image optimization. Now, however, most are relying on the CMS (content management system) for image resizing and compression. This means that, in most cases, the image optimization is happening after upload. This process results in overly large and heavy file weights for images, which slows down page speed — and, if extensively implemented across the site, it can result in lower site positioning.
Why can’t you rely on the CMS to resize/compress your images?
When you use a CMS to resize an image, it is usually only changing the image size and not compressing the image, or your server is resizing it “on the fly.”
If it is compressing the image (like in WordPress), the rate is preset; this means that even if it does a decent job, your files are still going to average 15 percent to 30 percent larger than if they had been properly compressed before upload. If your CMS is resizing images “on the fly,” meaning that they are resized as they are served, then very little (if any) compression is done.
This can be very problematic on sites that have multiple images per page. More often than not in the audits performed, images average 40 percent to 60 percent of the page weight, with a potential 30 percent to 50 percent image weight savings had the images been processed before upload.
So, what do you need to do before you upload your images?
Preparing images for your site
Resizing images
Resizing the image is very important. If you have a 2400px wide image, and all you need is a 500px wide image on the site, even resizing inside your CMS will require it to compress all the information in the 2400px image. This makes your image far larger to begin with.
Now, most teams do not have a person dedicated to image resizing and compression. This means that although we should have multiple optimized image sizes for desktop, tablet and mobile, you might not have the resources to do this.
If this is the case, the most important thing to do with any image on a site is to save it in the largest physical size needed, but NO larger. This means if you need three images and 800 x 600 pixels is the largest size needed, then make sure you resize the original image to 800 x 600 in a proper program like Photoshop. Then, even if you still have to resize inside the CMS, you are working with a smaller file size from the beginning.
File types
So, first you must resize the image, compress, and then upload. However, not only is a failure to resize and compress before upload an issue, but simply choosing the right file type has become problematic. Many people who handle images on a site these days often do not have image experience, so they will use a JPG when you should use a PNG, and vice versa.
Why does this matter? When you use the wrong file type, you can increase the file weight, sometimes quite dramatically. So, what file types do you use?
There are several file types, with JPG, GIF, PNG and WebP being the most common. Out of these, the ones you are going to use most often are JPG and PNG.

What About GIF or WebP?
No one should use a GIF unless animating an image. And while WebP shows great promise in its high-quality, no-loss compression algorithms, right now it is not highly supported, and special programming has to be used to get the it to work with any browser outside the supported browsers like Opera and Chrome.
This does not mean you cannot use it, but it does mean you cannot use it without creating the workarounds for unsupported browsers. For most, it is easier to stick with the standard formats of JPG and PNG. WebP will likely become the standard once we perfect its support. It can save images at a much lower file weight with much higher quality.
TIP: If you want to use WebP, Google has an image converter for you.
Picking the right file type
Too often, people choose their file type by whatever shows up as the default in the image program. However, the wrong file type choice can actually cause your images to be larger than they need to be.
As the chart above shows, there are multiple considerations for whether you want a JPG or PNG, but the easiest way to remember is to ask yourself: Are you looking at a photo or something else, like art or a logo? Any time you are saving a photo, you want to use JPG; for all else (logos, line art, artworks and so on), you want to use a PNG.
When we use the wrong format, we can significantly add weight and size. In addition, line art may not look as clear or crisp using a lossy compression model (where data is lost), like with a JPG.
JPGs vs. PNGs
The difference is lossy vs. lossless compression.
JPGs use what is called “lossy” compression. This means that some data is permanently lost as the file is compressed. The eye typically does not easily perceive the lost data, so you get a smaller file with minimal degradation.
Of course, this is reliant on the quality of the saved JPG. The more the quality is reduced, the more data that is lost. If saved at too low a quality, the image can start “ghosting,” meaning that artifacts will appear in the final image. If you want to avoid this issue, don’t go below a 50 percent quality rate when saving the image. With today’s graphics cards, a 50 percent rate should leave the quality high enough to look right, but low enough to save a great deal of file size.
TIP: Use the progressive setting when saving a JPG, so when they load into the browser as though they are “fading into” the document. Users won’t experience issues like page jumping and are more likely to perceive the page as faster loading.
PNGs use what is called “lossless” compression. Lossless means that as the file is saved, data is not lost. The image is re-sampled and a “nearest neighbor” (similar color) might be used when compiling the data, but data is not removed from the file.
There are two types of PNG: one is a 24-bit and one is an 8-bit. When you are trying to reduce file size, you want the 8-bit PNG setting. You also may want to go further and remove colors from your PNG file.
TIP: When saving PNGs in Photoshop, use Export > Save for Web (legacy). You can select fewer colors or black-and-white, which can reduce PNG files by as much as 50 percent to 90 percent.
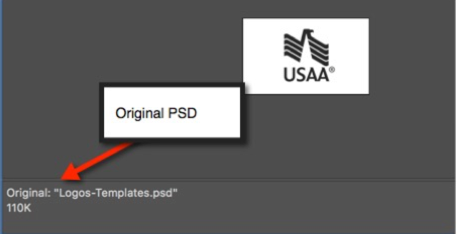
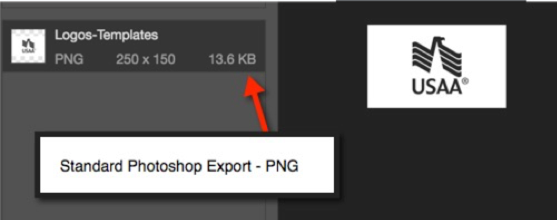
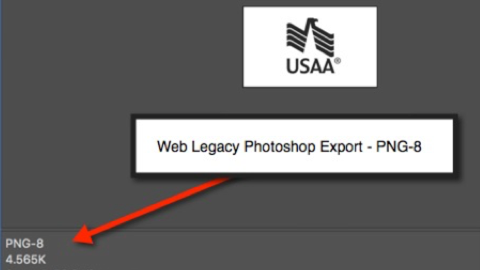
To illustrate all this, I’ve taken the same file — a logo — and saved as a PSD, PNG 8-BIT and PNG 8-BIT Black and White below. We can see massive reductions in file size when we use the PNG 8 with color removal to use only the colors needed.
Original File = 110KB
Standard Photoshop Export – PNG 8 = 13.8 KB
Web Legacy Photoshop Export – PNG 8 = 4.56KB
Web Legacy Photoshop Export – PNG 8 (grayscale 4 colors) = 1.41KB
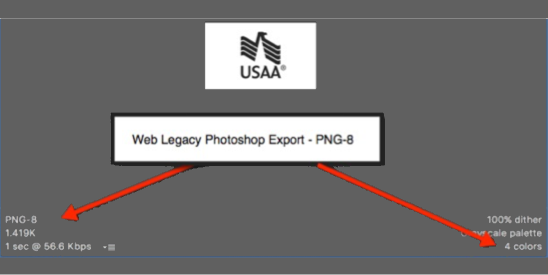
So, we can see here that by using the proper PNG-8 with color reduction, we can reduce the size of our image by over 95 percent. Our 110 KB image can be reduced to 1.41 KB.
This may not seem like much because it is one image, but if you had 10 sponsor logos on a page, you might be looking at a savings of 40kb to 100kb on that page alone.
So, as we see here, you can save a lot of page weight by simply performing an initial resize and compression on save before upload.
Why not mention SVG?
SVG is a technology where images are encoded into the page. The issues with SVG are that it requires someone with the knowledge to create and implement them, it creates huge blocks of code, it does not handle sophisticated image elements well, and it can be hard to support on older browsers.
However, if none of those parameters are an issue for you, it can be very good solution for images like the site logo that show up on all pages and in all device types, or when creating simple infographics. Be aware, though, that creating thousands of lines of code to display images is not necessarily saving page weight.
If you are using SVG, here are some tips:
- Have someone on staff or contract that can properly create/implement them.
- Ensure that the SVG images are lighter than your saved images (they can be larger).
- Ensure tags are properly implemented so you get the benefits of what would be the “alt” tag in a regular image when needed.
- An example of this would be to call in the SVG file and use an alt tag in the code.
<img src=”logo.svg” alt=”Website Logo” />
- An example of this would be to call in the SVG file and use an alt tag in the code.
- If social sharing is important for your images, you will need to supply a traditional image file that can be loaded for social sharing.
- Don’t use SVGs if you have a large or significant portion of users using old browsers. These do not handle SVG well, if at all.
TIP: A good tool for creating SVG images is Inkscape.
Real-world examples
Using WebPageTest.org, we can see how image size is affecting large brands. (Note 1,000 ms = 1 second)
For this test, I picked the following sites. The only requirement, after being a known brand, was an image-heavy home page:
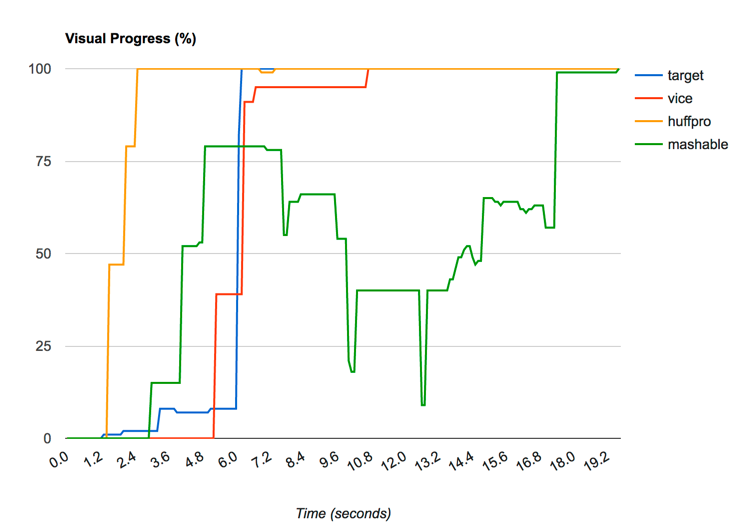
Time for visual progress
We can see here the time it takes the document to be visually complete. Surprisingly here, Huffington Post loads in pretty quickly at about 2 seconds, while Mashable takes a full 18.2 seconds.
Here are the number of requests per site for the home page, broken down by type. We find that images cause the highest number of requests on all sites.

Here are the number of bytes per page each site is downloading. Interestingly enough, Huffington Post is loading in much faster despite having the most image weight. This is likely due to the lazy load they are using on their images, which is a good technique IF you do not need the images indexed by Google. (Google has stated that they will typically ignore items in the lazy load — so, if you do use that technique, you have to be very careful you can still get your images indexed, if this is important to your site.)
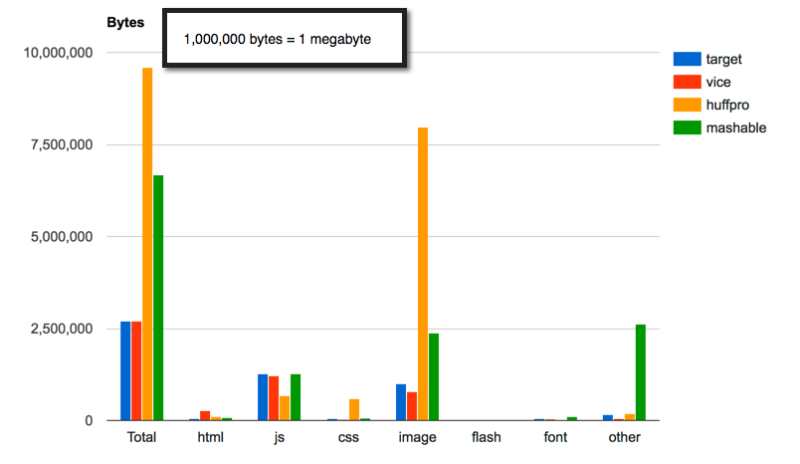
We can also see that Mashable does not use scripting techniques that minimize their page load, and at 2.5 megabytes of images on the page and another 2.5 megabytes of “other,” this page is operating at about 30 percent to 50 percent over what its page weight might be if properly optimized.
So, it is clear that this is a real issue. Yet it is such an easy fix. Make sure that you have proper compression on your servers and your site, but also optimize your images before you upload. It will save you a lot in page speed and download.
SEO, mobile-first and image weight
Later this year, according to Google, they will switch to mobile-first indexing, which means they are going to use your mobile site to determine your site positioning. However, at this time we don’t know how they are going to assess desktop users and page speed. Besides, slow sites still create issues for your users, so speeding it up can only benefit you in terms of site stickiness and reduced bounce rates.
Remember, page speed matters for your users, and it matters most on mobile. If you are not doing your best to optimize your pages for the fastest download, you are just selling yourself short and losing users, as well as possibly rankings.
Image optimization fixes are the easy win. Almost every site I have audited over the past three years has an image issue. Does yours? If you could save 20 percent to 40 percent of your page load time, wouldn’t it be worth it?
Contributing authors are invited to create content for Search Engine Land and are chosen for their expertise and contribution to the search community. Our contributors work under the oversight of the editorial staff and contributions are checked for quality and relevance to our readers. The opinions they express are their own.
Related stories
New on Search Engine Land
About the author