Making your first AMP Story: Google’s answer to Snapchat and Instagram
With Google ready to launch AMP Stories soon, Contributor Paul Shapiro shares how to build your own AMP Story and get in front of the latest content trend.
![]()
Among the many exciting announcements during AMP Conf 2018 in Amsterdam was the introduction of AMP Stories, a new format similar to Snapchat and Instagram Stories, implemented via a new accelerated mobile pages (AMP) component.
Unlike Snapchat and Instagram Stories, which are features within their own respective platforms, AMP Stories are going to be found in a mobile Google search engine results page (SERP). As with the rest of the AMP Project, other platforms are to leverage the format as well. These provide users with a highly engaging slideshow experience with rich media features such as video, audio, pictures and text in a format that mobile users have been known to love.
Here’s a one-minute video introducing the accelerated mobile pages (AMP) story format:
Excited yet? I am, but alas, it hasn’t rolled out to the public as of this writing. The amp-story component is still in “experimental” and development mode, and it must be enabled for the user within the AMP Dev Channel in order to get started.
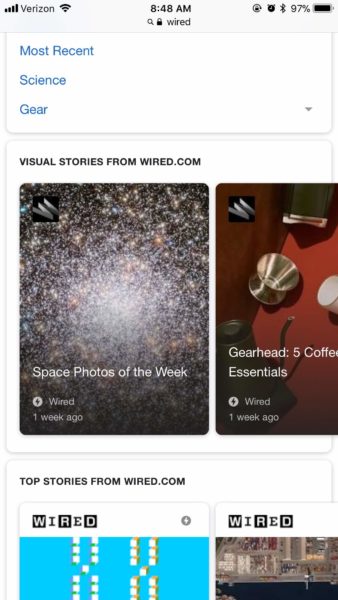
A select group of pre-approved publishers — including Microsoft, Wired and CNN — already have been experimenting with the format and can be found within the Google experience by navigating to g.co/ampstories and initiating a search for the respective publisher’s name.
For example, searching “Wired” will bring up a series of AMP Stories that Wired magazine has designed for their website.
If you’re interested in trying out AMP Stories on your own website, you can apply here to join the origin trial.
We should expect AMP Stories to roll out to the public in the near future, providing a truly unique way for users to interact with Google search and your content.
It’s worth getting ready in advance for these changes. To help your content management systems (CMS) get ready, I’ve created a tutorial you can use.
Advantages of AMP Stories
There are several advantages to AMP Stories compared to Instagram and Snapchat’s product:
- It will work with Google search and likely will reflect keyword-based intent rather than depending on social discovery.
- It is platform-independent and may be a format that a Twitter or Pinterest decides to use within their own platform.
- It’s scriptable-ripe for full or semi-automated story creation.
Let’s explore how we can script together our first AMP Story.
Your first AMP Story
The foundation of an AMP Story, is as you might expect, an AMPHTML page.
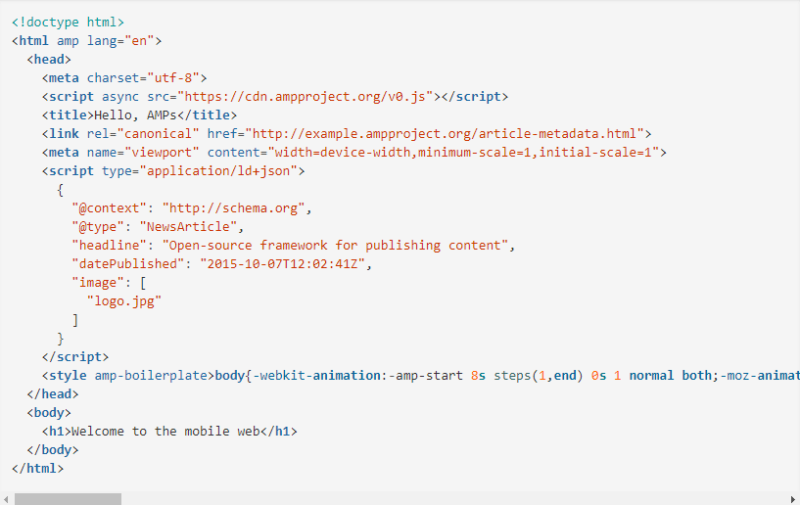
You can use a boilerplate template like the one above as your starting point.
(Note: the spaces you see in the tags throughout the rest of this column should not be included when you actually put the script together — they need to be removed. Use the longer script examples as a model for proper syntax.)
Since amp-story is an extended component of AMP, you will need to add an additional tag to your :

At this point, we’re ready to start actually constructing the AMP Story.
Creating an AMP Story sandwich
There are three main tags that compose an AMP Story, and you sort of sandwich them together to create the overall experience:
You start out with the tag as your bread. The rest are your cold cuts. -page > is encapsulated within , and then -grid > is encapsulated within -page >.
You will only have one tag on a given hypertext markup language (HTML) page.
As you might expect, represents a single “slide” within an AMP Story. Since you will likely have multiple slides within your AMP Story — which is sort of the point — you’ll have several of these tags within .
Lastly, within each you will have one or several tags, a tag based on CSS Grid layouts, used for arranging the various elements within each individual slide.
That is the basic concept behind constructing your first AMP Story. Now let’s dive a little deeper into some of the additional configurations and options available.
We start out with an element and its closing tag. This will be the only element permitted within the of our HTML page.
We need to add the attribute standalone, a requirement of , and then there are several optional attributes that can be appended in addition:
- bookend-config-src. We can use this to specify a javascript object notation (JSON) endpoint providing information about social sharing options and related links that will be found on the end screen of your AMP Story. (We’ll come back to this.)
- background-audio. We can specify an audio file that will play throughout the whole story experience. For instance, this may be an MP3 file.
In the end, your tag may look something like this:

We need an amp-story-page > for each slide of our AMP Story. Each element has a required id attribute, which should have a unique value for each page.
Then there are two optional attributes we may choose to include:
- auto-advance-after. We set a unit of time, forcing a single slide to auto-advance. For instance, if we set auto-advance-after=”5s”, after five seconds have elapsed, the AMP Story will advance to the next slide.
- background-audio. We can set an audio file to play while viewing that particular slide, unlike the attribute used at the level which will play throughout the whole AMP Story experience.
For example, that may look like this:

Now that we have one or more elements, we can start specifying their contents. We can use other elements within like , , and the special element. These elements are layered bottom-up, with the first layer in the document object model (DOM) sitting at the bottom, and the last at the top.
Each of these elements inside of has the ability to have its own distinct animation applied to it with one of several animation attributes:
- animate-in. If you’re going to animate an element, this is required, as it represents an entrance animation. There are predefined animations that can be specified as values, like fade-in and fly-in-left. For a complete list, see the documentation.
- animate-in-duration. You can denote a unit of time and specify the length of your animation duration if you want to shorten or lengthen said animation.
- animate-in-delay. You can delay the start of an animation by specifying a unit of time.
- animate-in-after. You can use this to denote the order of animations in a sequence within a given . Give your various animated elements id attributes, then specify said id as a value of animate-in-after.
For example, that may look something like this:

Now, let’s explore some more advanced layering of elements within and look at .
Among the many standard HTML or accelerated mobile pages HTML (AMPHTML) elements we can include within , there is the special element that helps the building of layers similar to CSS grids, with some easy-to-use pre-designed templates.
There are four pre-defined templates we can use with :
- Fill. Shows the first child full bleed. This is really nice to use with an image.
- Vertical. Layers elements vertically from top to bottom.
- Horizontal. This layers elements horizontals from left to right and may take up all of the vertical space of .
- Thirds. This template divides your screen into three rows of equal sizes. You can put different content within each row. The rows are denoted as upper-third, middle-third and lower-third.
As always, the AMP documentation on this is a breath of fresh air, and it has very good visual representations of these templates if you need help.
For example:

In the example above, we are using two elements. The first one is using the fill template to display a full-screen image as a background.
The second is using the vertical template to stack a headline and sub-headline on top of that image.
This is a simple example, but you can definitely do some much more interesting layering using .
The bookend JSON file endpoint
The last thing worth mentioning is that we can create a JSON endpoint, called a bookend, which allows us to specify some content to display on the last slide.
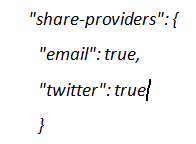
It can also be used to specify which social sharing options are available for the AMP Story. It’s very simple to configure if you’re familiar with JSON.
For the social sharing functionality, we can specify a JSON object of share-providers, where we specify which providers we’ll enable as true:
We can also specify in a related-article object, an array of links to display, each with a title, URL and thumbnail image:
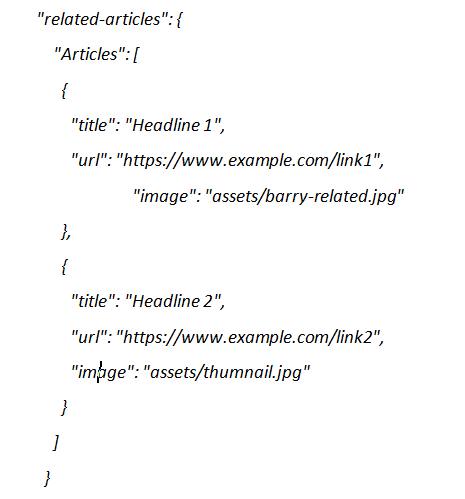
We put this together in a single JSON file and call it within the bookend-config-src attribute of .
An example of putting it all together
At this point, you should have all the knowledge needed to create your own AMP story. As an example, I created a demo, converting one of Barry Schwartz’s Daily Search Forum Recaps on Search Engine Roundtable into the format.
Since I am not an approved publisher, the demo will not show up in Google search results. If you’re interested in the construction of the demo’s code, click here.
Contributing authors are invited to create content for Search Engine Land and are chosen for their expertise and contribution to the search community. Our contributors work under the oversight of the editorial staff and contributions are checked for quality and relevance to our readers. The opinions they express are their own.
Related stories
New on Search Engine Land
About the author