Performing a manual backlink audit, step by step
Need to get rid of problematic or unnatural backlinks and not sure where to begin? In this helpful how-to, columnist Dave Davies outlines his process for performing a manual backlink audit.

It might be every SEO’s least favorite job: the backlink audit. This is not because the work itself is horrible (though it can be tedious on sites with large link footprints), but because it’s almost always performed when a domain is in trouble.
Whether you’re reading this article because you’re an SEO looking at new strategies or a site owner that has received a link-based penalty, I hope you find the methodology below helpful.
I should note before proceeding that I prefer robust datasets, and so I’ll be using four link datasets in the example. They are:
Though I have paid accounts with all of the tools above (except for the Search Console, which is free), each offers a way to get the data for free — either via a trial account or free data for site owners. There are also other link sources you can use, like Spyfu or SEMrush, but the above four combined tend to capture the lion’s share of your backlink data.
Now, let’s begin …
Pulling data
The first step in the process is to pull the data from the above listed sources. Below, I will outline the process for each platform.
Google Search Console
- Once logged in, select the property you want to download the backlinks from.
- In the left navigation, under “Search Traffic,” click “Links to Your Site.”
- Under the Who links the most column, click “More.”
- Click the buttons, “Download more sample links” and “Download latest links,” then save each CSV to a folder.
Majestic
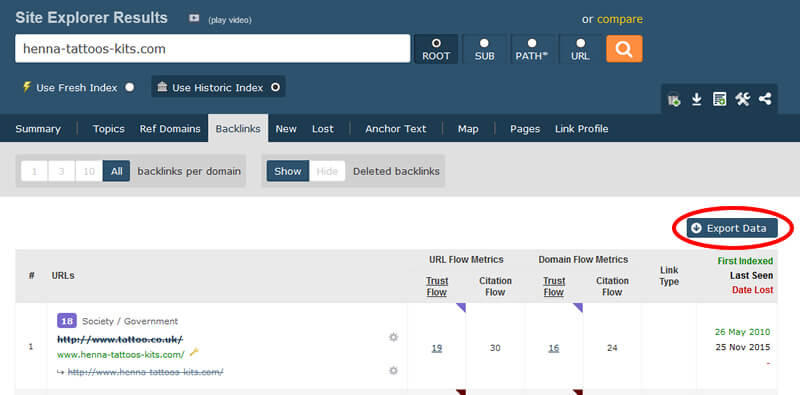
- If you don’t have one, create an account, as you’ll need it to export data. If all you want is access to your own site’s data (which is what we want here), they’ll give you free access to it. You can find more information on that at https://majestic.com/account/register. The rest of these instructions will follow the paid account process, but they are essentially the same.
- Enter your domain into the search box.
- Click the “Backlinks” tab above the results.
- In the options, make sure you have “All” selected for “backlinks per domain” and “Use Historic Index” (rather than “Use Fresh Index”).
- Click “Export Data,” and save the file to the folder created earlier.
- If you have a lot of data, you will be directed to create an “Advanced Report,” where you then need to create a “Domain Report.”
Ahrefs
- If you don’t have an account, you can sign up for a free trial.
- Enter your domain into the search box.
- Click “Backlinks” at the top of the left navigation.
- Select “All links” in the options above the results.
- Click “Export,” and save the file to the folder created earlier.
Moz
- If you don’t have an account, sign up for a free trial to get complete data.
- From the home page, click “Moz Tools” in the top navigation, then “View all Moz products” in the drop-down.
- Click “Open Site Explorer” on the resulting page.
- Enter your domain into the URL field.
- In the options above the results, select “this root domain” under the target.
- Click “Request CSV,” and when it’s available, save it to the same folder as the other files.
Conditioning your data
Next, we need to condition the data by getting all of the backlinks into one list and filtering out the known duplicates. Each spreadsheet you’ve downloaded is a little different. Here’s what you’re looking at:
- Google Search Console. You’ll have two spreadsheets from the Search Console. Open them both, and copy all the URLs in the first column of each to a new spreadsheet, removing the header rows. Both will go into Column A, one after the other.
- Majestic. In the Majestic download, you will find the link source URL in Column B. You will want to copy all of these URLs into the same spreadsheet that you’ve copied the Search Console links into. To do this, you will insert the Majestic data directly below the Search Console data in column A.
- Ahrefs. Ahrefs puts the source URL in column D. Copy all of these URLs to the new spreadsheet, again in Column A, directly below the links you’ve already added.
- Moz. Moz puts the source URL in Column A. Copy all of these URLs again into Column A of your new spreadsheet directly below the other data you have entered.
Now you should have a list of all the backlinks from all four sources in Column A of a new spreadsheet. You will then select Column A, click on the “Data” tab at the top (assuming you’re working in Excel) and click “Remove Duplicates.” This will remove the links that were duplicated between the various data sources.
The next step is to select all the remaining rows of data and copy them into a Notepad document, then save the document somewhere easily referenced.
And now the fun part…
You’ve now got a list of all of your inbound backlinks, but that’s not particularly useful. What we want to do next is to gather unified data for them all. That’s where URL Profiler comes in. For this step, you’ll have to download URL Profiler. Like the other tools I’ve mentioned thus far, URL Profiler has a free trial; so if it’s a one-off, you can stick with the trial.
Once downloaded and installed, there’s a bit of a setup process designed to aid you in a speedy analysis. The first thing you’ll need to do is click the “Accounts” menu, which will bring up the windows to enter your API keys from the various tools discussed previously.
Helpfully, each tab gives you a link to the step-by-step instructions on getting your various API keys, so I won’t cover that here. That leaves me to get to the good part…
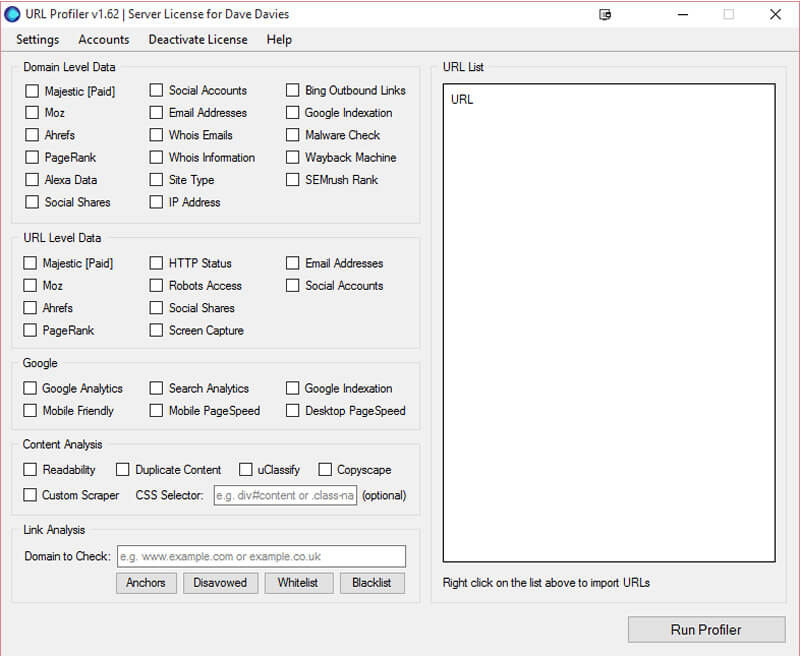
You will now be presented with a screen that looks like this:
The first step is to right click the large, empty URL List box on the right and select to “Import From File.” From there, choose the Notepad document you created with the links in your spreadsheet above.
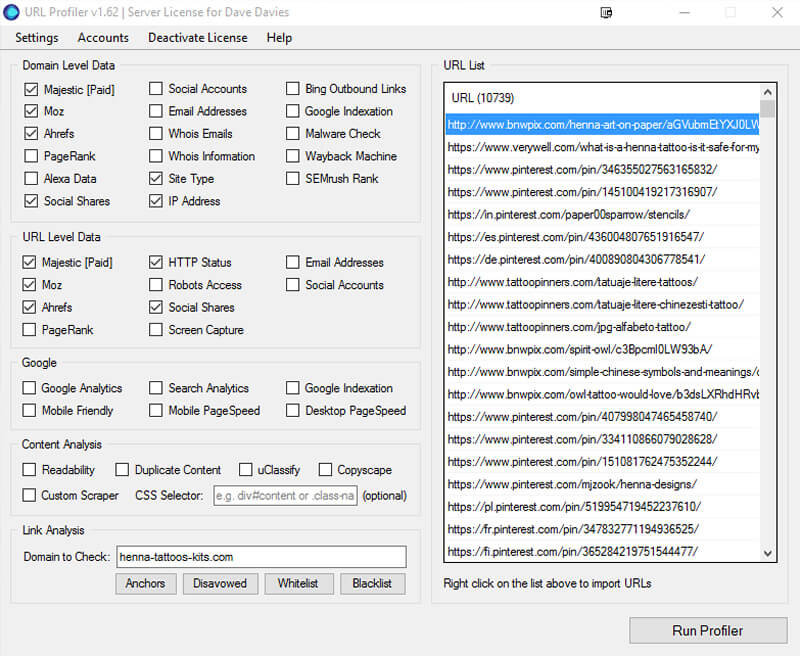
You’ll now see a list of all your backlinks in the box, and you’ll need to select all the data that you want to collect from the boxes on the left. The more data you want, the longer it will take, and the more you’ll have to weed though — so you generally only want to select the data relevant to the task at hand. When I am looking for low-quality links, I tend to select the following:
Domain-level data
- Majestic [Paid]
- Moz
- Ahrefs
- Social Shares
- Site Type
- IP Address
URL-level data
- Majestic [Paid]
- Moz
- Ahrefs
- HTTP Status
- Social Shares
In the “Link Analysis” field at the bottom, you will enter the your domain. This will leave you with a screen similar to this one:
Click “Run Profiler.” At this stage, you can go grab a coffee. Your computer is hard at work on your behalf. If you don’t have a ton of RAM and you have a lot of links to crawl, it can bog things down, so this may require some patience. If you have a lot to do, I recommend running it overnight or on a machine dedicated to the task.
Once it’s completed, you’ll be left with a spreadsheet of your links. This is where combining all of the data from all of the backlink sources and then unifying the information you have on them pays off.
So, let’s move on to the final step…
Performing your backlink audit
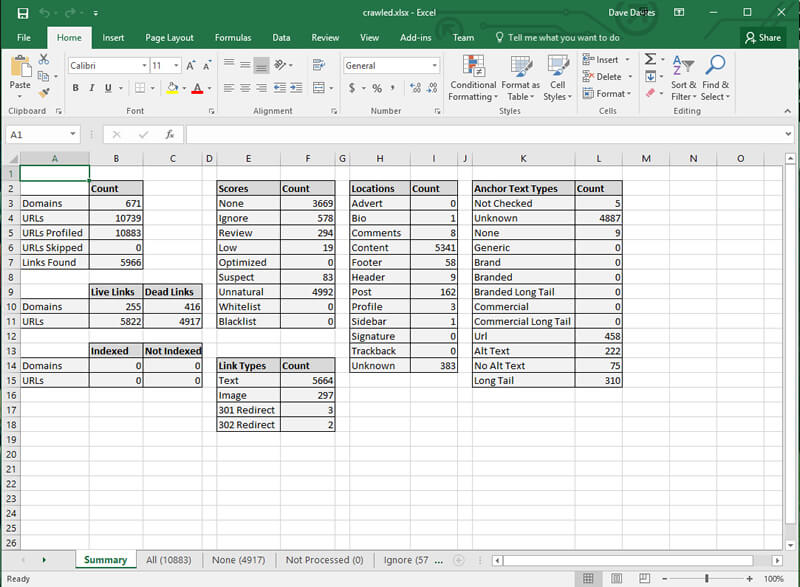
Once URL Profiler is done, you can open the spreadsheet with the results. It will look something like this:
Now, the first thing I tend to do is delete all of the tabs except “All.” I love tools that collect data, but I’m not a fan of automated grading systems. I also like to get a visual, even on the items I will be moving back to similar tabs that I am deleting in this stage (more below).
With those extra tabs removed, you are left with a spreadsheet of all your backlinks and unified data. The next step is to remove the columns you don’t want cluttering your spreadsheet. It’s going to be wide enough as-is without extra columns.
While the columns you select to keep will depend on specifically what you’re looking for (and which data you decided to include), I tend to find the following to be globally helpful:
- URL
- Server Country
- IP Address
- Domains On IP
- HTTP Status Code (and if you don’t know your codes, HTTP Status)
- Site Type
- Link Status
- Link Score
- Target URL
- Anchor Text
- Link Type
- Link Location
- Rel Nofollow
- Domain Majestic CitationFlow
- Domain Majestic TrustFlow
- Domain Mozscape Domain Authority
- Domain Mozscape Page Authority
- Domain Mozscape MozRank
- Domain Mozscape MozTrust
- Domain Ahrefs Rank
- URL Majestic CitationFlow
- URL Majestic TrustFlow
- URL Mozscape Page Authority
- URL Mozscape MozRank
- URL Mozscape MozTrust
- URL Ahrefs Rank
- URL Google Plus Ones
- URL Facebook Likes
- URL Facebook Shares
- URL Facebook Comments
- URL Facebook Total
- URL LinkedIn Shares
- URL Pinterest Pins
- URL Total Shares
And for those who have ever made fun of me that my desk looks like …
… now you know why! While doable on a single monitor, it would require a lot of scrolling. I recommend at least two monitors (and preferably three) if you have a lot of backlinks to go through. But that’s up to you.
Now, back to what we do with all these rows of backlinks.
The first step is to create three new tabs. I name mine: nofollow, nolink and nopage.
- Step one: Sort by HTTP status, and remove the rows that don’t produce a 200 code. Essentially, these pages did once exist and don’t anymore. I will occasionally run them through the URL Profiler again just to make sure a site is not temporarily down, but for most uses, this isn’t necessary. Move these to the “nopage” sheet in your Excel doc.
- Step two: Sort by Link Status. We only need the links that are actually found. The databases (especially Majestic’s historic) will hold any URL that had a link to you. If that link has been removed, you obviously don’t want to have to think about it in the auditing process. Move these to the “nolink” tab.
- Step three: Sort by Rel Nofollow. In most cases, you don’t need to spend time on the nofollowed links, so it’s good to get them out of the data you will be going through. Move these to “nofollow.”
In the site I am using in this example, I started with 10,883 rows of links. After these three steps, I am left with 5,393. I now have less than half the links I initially had to sort through.
Working with the remaining data
What you do with your data now will depend on specifically what you are looking for. I can’t possibly list off all the various use cases here, but following are a few of the common sorting systems I use to speed up the review process and reduce the number of individual pages I need to visit when trying to locate unnatural links:
- Sort by anchor text first, then URL. This will give you a very solid picture of anchor text overuse. Where you see heavy use of specific anchors or suspicious ones (“payday loans,” anyone?), you know you need to focus in on those and review the links. By grouping by domain secondarily, you won’t accidentally visit 100 links from the same domain just to make the same decision. It will also make run-of-site issues far more apparent.
- Sort by domains on IP first, then URL. This will give you a very quick grasp of whether your backlink profile is part of a low-end link scheme. If you’ve bought cheap links, you might want to start with this one.
- Sort by site type first, then Majestic, Ahrefs or Moz scores. I’ll leave it up to you which score you trust more, though none should be taken as gospel. These scores are based on algorithms built by some very smart people, but not Google. That said, if you see good scores on all three, you can at least review the site knowing this.
As I’m reviewing — and before visiting a link — I tend to scan the various scores, the social shares for the URL and the Link Location. This will tell me a lot about what I’m likely to find and where I’m likely to find it.
Over time, you’ll develop instincts on which links you need to visit and which you don’t. I tend to view perhaps more than I need to, but I often find myself working on link penalty audits, so diligence there is the key.
If you are simply wanting to review your backlinks periodically to make sure nothing problematic is in there, then you’ll likely be able to skip more of the manual reviewing and base more decisions on data.
In conclusion
The key to a good audit of any type is to collect reliable data and place it in a format that is as easy as possible to digest and work with. While there’s a lot of data to deal with in these spreadsheets, any less and you wouldn’t have as full a picture.
Though this process isn’t automated (as you’re now well aware), it dramatically speeds up the process of conducting a backlink audit, reduces the time you need to spend on any specific page judging your links (thanks to the developer for adding the “Link Location” in) and allows for faster bulk decisions.
For example, in simply sorting by URL, I quickly scanned through the list and found directory.askbee.net linking 4,342 times due to some major technical issues with a low-quality directory. Now, we’re down to 1,051 links to contend with.
Again, each need requires different filters, but as you play with different sorting based on what you need to accomplish, you’ll fast discover that a manual backlink audit, while taxing and time-consuming, doesn’t have to be the nightmare it can often seem.
Contributing authors are invited to create content for Search Engine Land and are chosen for their expertise and contribution to the search community. Our contributors work under the oversight of the editorial staff and contributions are checked for quality and relevance to our readers. The opinions they express are their own.
Related stories


