Simplifying Google Analytics configuration with Google Tag Manager
Using analytics through GTM allows you to simplify the code in place on your site and quickly set up advanced features like cross-domain tracking.
Google Analytics is a crucial part of any online marketer’s toolbox. Getting analytics data starts with a proper installation of the tracking code. Thankfully, Google Tag Manager makes this process simple, even when modifications to the Analytics code are required.
Google Tag Manager (GTM) allows you to deploy Google Analytics tracking without adding any further code to your website. Extensive configuration options allow you to tweak the setup based on your needs.
In this article, I’ll cover how to set up Google Analytics through GTM, along with some tips for customization based on your needs.
Installing a global Google Analytics tag
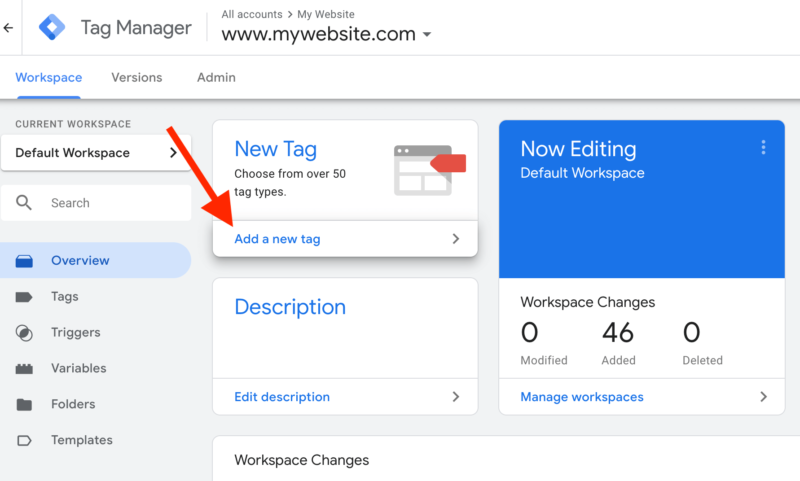
Navigate to your desired GTM account and container. From the Overview screen, select “Add a new tag.”
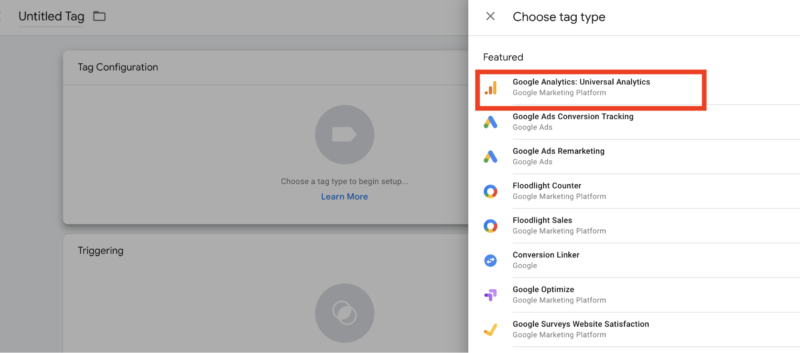
Next, click within the Tag Configuration box to choose a tag type. Select “Google Analytics: Universal Analytics.”
Leave the “Track Type” dropdown set to “Page View.” Next, under “Google Analytics Settings,” choose “New Variable.”

Now, you’ll create a variable that includes your unique Google Analytics Tracking ID. After a one-time setup, you’ll be able to reuse this variable in any future GA tags. You can also customize settings for the variable under “Advanced Configuration,” or override settings within a specific tag by checking the “Enable overriding settings” box.
Find your Tracking ID (you can locate this quickly by going to Tracking Info > Tracking Code within the Admin section of your GA account) and paste it into the respective field in GTM. Name and save the variable.

Now, return to editing your tag and select the GA variable you created.
Next, click within the Triggering section to choose which pages you want the tag to appear on. To deploy globally wherever your GTM code is in place, select “All Pages.” Submit changes to push your tag live.
Event tracking
Events are incredibly useful in Google Analytics to track any interactions that aren’t registered by default. Some possible actions include clicks on elements within pages, scroll activity, file downloads, video views, and form submissions.
To fire an event, choose “Event” from the “Track Type” dropdown when creating your GA tag. Next, fill in the fields with the appropriate parameters for your event.
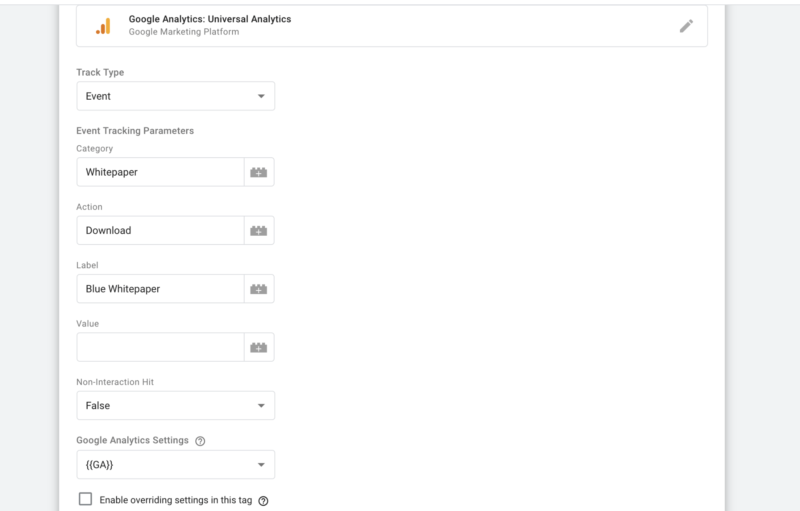
For instance, in this example, we’re tracking a whitepaper download. Our fields include:
- Category: “Whitepaper”
- Action: “Download”
- Label: “Blue Whitepaper”
Also note the Non-Interaction Hit dropdown. By default, when set to “False,” the event will count as an interaction, meaning the session won’t be considered a bounce if the user completes the associated action. If you set this dropdown to “True,” a user could complete the action but still count as a bounce if they leave the page before doing anything else.
Cross-domain tracking
If you’re using the same Google Analytics account across multiple domains, you should enable cross-domain tracking to ensure that users are being tracked properly when going from one domain to another. Otherwise, they’ll be seen as separate visitors to each domain.
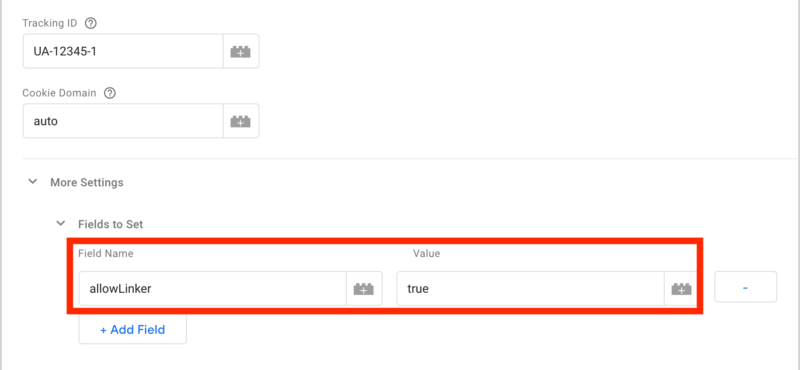
First, under “More Settings” for your GA variable, open the “Fields to Set” section. Type “allowLinker” for Field Name and “true” for Value.
Next, further down in the “More Settings” options, click the “Cross Domain Tracking” dropdown. In the “Auto Link Domains” field, insert all domains you’d like to track, separated by commas.
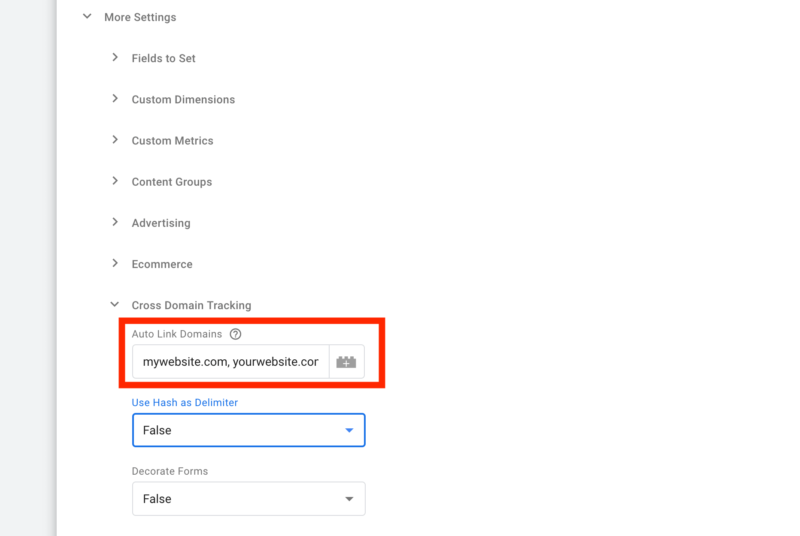
If you’re using a form that takes a user to another domain upon submission, you’ll also want to choose “True” in the “Decorate Forms” dropdown.
Save the variable and submit to push live. You should now see unified reporting across domains, eliminating duplication of user counts if the same people visit multiple sites with your GA tag.
Enhanced link attribution
Google offers a handy Page Analytics Chrome extension, which allows you to visualize click data for links on your site. You can see how many clicks occurred on each link, as well as what percentage of total clicks for a page went to each.
Unfortunately, by default, this report groups together counts for any links going to the same URL. So if you link to the same URL from both a top navigation bar and your site’s footer, each link will show the same click count.
Thankfully, a simple setting change allows you to differentiate between clicks on different elements. When editing your Google Analytics variable, look for the “More Settings” option below where you entered your Tracking ID.
Within the options that appear, click “Advanced Configuration.” You’ll now see a dropdown labeled “Enable Enhanced Link Attribution.” Select “True” here.
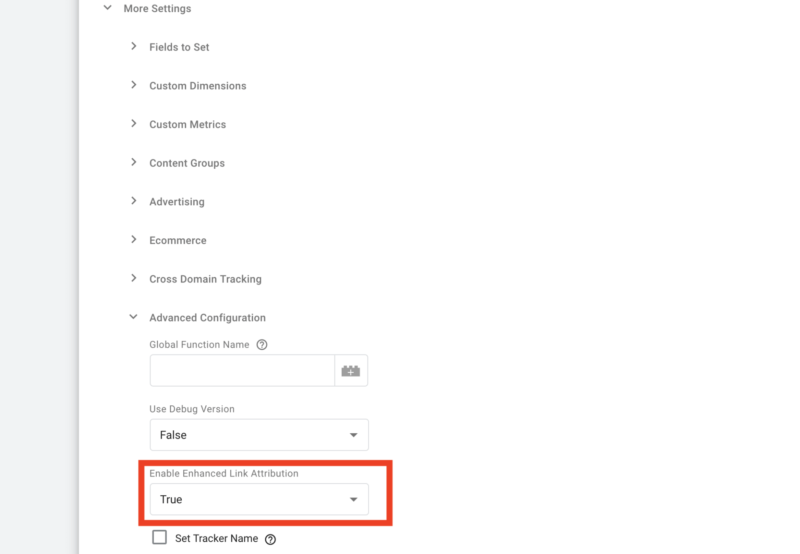
Once you’ve saved and published this change, you’ll now see unique counts for each link in the Page Analytics report.
Conclusion
Google Tag Manager offers an extensive integration with Google Analytics, allowing you to configure anything from installing the default code to covering advanced tracking scenarios. Setting up Analytics through GTM allows you to simplify the code in place on your site, as well as easily allow access to tweak settings without requiring development updates. You can quickly set up advanced features like cross-domain tracking.
If you haven’t done so yet, make GTM a part of your workflow for setting up Google Analytics implementations. Explore advanced options to customize as needed. You’ll save time and reduce friction with developers.
Contributing authors are invited to create content for Search Engine Land and are chosen for their expertise and contribution to the search community. Our contributors work under the oversight of the editorial staff and contributions are checked for quality and relevance to our readers. Search Engine Land is owned by Semrush. Contributor was not asked to make any direct or indirect mentions of Semrush. The opinions they express are their own.


